Friday 30 March 2018

Stampin' Up!® Party Pandas Design Team Project #stampinforall

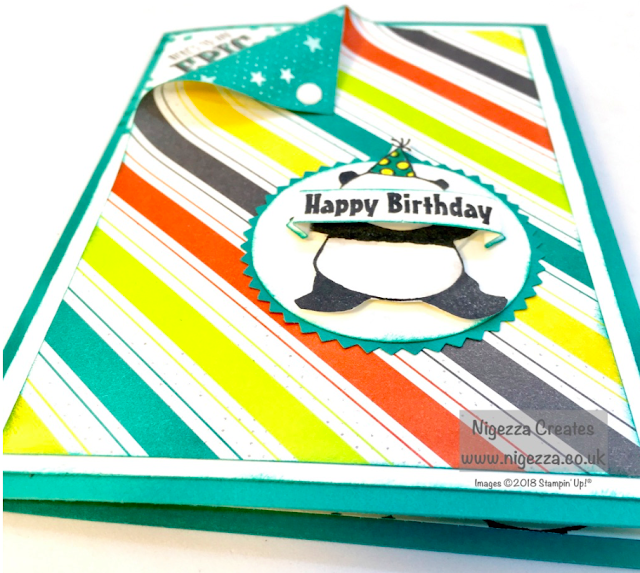
It is my turn to do the weekly Design Team project over at #stampinforall. My theme was Childs card so of course I have used the Party Pandas. I am sharing the tutorial earlier than usual so that you can still get your hands on the Party Pandas for FREE. SAB ends on Saturday 31st March so if you want this set you need to place an order before the closing time on Friday which will be around 10`pm in the UK.

Here I am sharing how I made this card, on Saturday I will do another blog about this project that will show the cards that members of #stampinforall have also made so be sure to come back and see those.

Party Pandas Nigezza Creates

Measurements & Resources

  • Party Pandas Stamp Set - FREE with a £45 order
  • Bubbles & Fizz DSP - Free with a £45 order
  • Epic Celebrations Stamp Set - FREE with a £45 order
  • Bermuda Bay Ink
  • Momento Ink
  • Bermuda Bay Dark Blends alcohol marker
  • Daffodil Delight Dark Blends alcohol marker
  • Basic Gray Light Blends alcohol marker
  • Colour lifter Blends
  • Starburst punch
  • 2" Circle punch 
  • Classic Label Punch
  • White Perfect Accents
  • Bermuda Bay Cardstock
  • Whisper White Cardstock
  • Bone Folder
  • I have used a standard card base in Bermuda Bay 5 7/8" x 8 1/4"
  • Folded in half
  • 2 x Mats in Whisper White 5 5/8" x 3 7/8"
  • Mat in the FREE SAB DSP Bubbles & Fizz 5 3/8" x 3 5/8"
  • I used a bone folder to curl the corner of the DSP so that I could stamp a sentiment in the corner
  • I also tamped the circles, stars and squares around the sentiment like confetti at party
  • The White Perfect Accent was stuck on the corner like a button that was fastened down
  • I really like how this effect turned out - it gives the card some extra dimension and interest.
Stampin' Up!® Party Pandas Design Team Project #stampinforall

  • The Panda was stamped and fussy cut out and adhered to the 2" circle
  • The sentiment was stamped onto a scrap and punched out using the classic label punch 
  • This was then concertina folded at each end so it could be held by the Panda as a banner
  • I used the alcohol markers on the panda to colour the party hat and also for shading on the panda
  • I love how bright this card is and I think would really appeal to a child
Stampin' Up!® Party Pandas Design Team Project #stampinforall


  • I finished off the card with a Whisper White Mat on the inside
  • I stamped the confetti style stamp in each corner
  • I also stamped the Panda again
  • I used the sentiment from the Epic Celebrations
  • Awesome is a term children use a lot so again I felt this was an appropriate sentiment
Stampin' Up!® Party Pandas Design Team Project #stampinforall


Stampin' Up!® Party Pandas Design Team Project #stampinforall


I really like the way this card has turned out. It has a real party feel to it and the bright colours will really go down well with children of all ages.

So now you have all the resources gathered, click the video below and follow my tutorial t create this card yourself :-)


I hope you enjoyed this project, don't forget if you want any FREE Sale-A-Bration items you only have a few days left.

See you soon

Gez xxx

My Shop 

My shop is open 24/7 Click here to shop! Remember that during Sale-A-Bration you earn free products for every £45 you spend (not including p&p)

Joining Offer

There is no better time to join Stamping' Up, during Sale-A-Bration you get to chose

  • £130 worth of products for your starter kit 
  • AND 2 stamp sets of your choice 
  • All for £99 (p&p free with starter kits). 
  • 20% discount on future orders, rising to 25% when promoted
  • There is no obligation to sell you can be a hobby demonstrator and just shop for yourself with the 20% discount. 
  • Click here to join my team!


Follow me on Facebook

Follow me on Instagram

Follow me on Pinterest

Join my Facebook Group

Wednesday 28 March 2018

Stampin' Up!® Easter Basket

Thanks you for joining m today for an Easter Project. The new Basket Weave Textured Impressions embossing folder from Stampin' Up! makes a perfect Easter basket for little foiled eggs. The embossing folder is part of a freebie during Sale-A-Bration, for a £90 spend you get it free with a stamp set, but hurry there is only a few days left until it ends on March 31st 2018.

Stampin' Up! Easter Basket Nigezza Creates


Measurements & Supplies

  • 2 x Extra Thick Whisper White 6" x 4"
  • Embossed in the Basket Weave Textured Impressions embossing folder
  • Scrap of Springtime Foils for the bow
  • Bow Builder punch
  • Everyday Label punch 
  • Versamark
  • Copper Embossing powder
Stampin' Up! Easter Basket Nigezza Creates

Making up the basket

  • Emboss each piece of card stock
  • Cover in Versamark by dragging pas over the raised basket weave
  • Cover with Coper embossing powder and heat emboss
  • On one of the rectangles on the long side score @ 1 1/8" - 2 1/4" - 3 3/4" - 4 7/8"
  • On the short side score @ 1 1/2" - 2 1/2"
  • The other rectangle is to be used for the handle and decoration
  • Cut a strip 6"x1 1/2"
  • Score strip @ 3/4" fold and glue
  • Use the Everyday label punch and punch out 2 labels
  • Use Bow Builder punch to cut out bow sections from Springtime Foils

So now you have all the required bits and bobs press play below and watch the tutorial and craft along with me!


I hope you enjoyed this project and have a very good Easter, see you soon :-)

Gez xxx


My Shop 

My shop is open 24/7 Click here to shop! Remember that during Sale-A-Bration you earn free products for every £45 you spend (not including p&p)

Joining Offer

There is no better time to join Stamping' Up, during Sale-A-Bration you get to chose

  • £130 worth of products for your starter kit 
  • AND 2 stamp sets of your choice 
  • All for £99 (p&p free with starter kits). 
  • 20% discount on future orders, rising to 25% when promoted
  • There is no obligation to sell you can be a hobby demonstrator and just shop for yourself with the 20% discount. 
  • Click here to join my team!


Follow me on Facebook

Follow me on Instagram

Follow me on Pinterest

Join my Facebook Group


Monday 26 March 2018

Stampin' Up!® Springtime Foils Christmas Card using the Stamparatus®

Here I am again with another Christmas card. This one is very similar to the Emerald Envy Christmas Tree card I did a few weeks ago. Today I am using the FREE DSP from Stampin' Up! during Sale-A-Bration. I just thought this dotty paper looked like snow so just had to make a Christmas card with it. I have used the Waterfront stamp set again for the Christmas trees.


Measurements
  • Card base Extra Thick Whisper White card stock - half of A4 - 5 7/8" x 8 1/4"
  • This makes a standard card blank - 5 7/8" x 4 1/8"
  • I cut a mat in Copper Foil - 5 5/8" x 3 7/8"
  • I cut a second mat in the dotty Springtime Foils - 5 3/8" x 3 5/8"
  • I used a length of Copper Trim
  • Merry Christmas sentiment from Teeny Tiny Sentiments
  • I used versa mark and copper embossing powder for the sentiment on a scrap of Whisper White  
Using the Stamparatus®
  • NB: Please be careful with the magnets as they are VERY STRONG and if placed too close to each other they will literally jump together and will break.
  • I have put duct tape around my magnets so I can pick them up easier
  • I have only ever had to use one at a time so far
Stamping with the Stamapratus®
  • I used the foam mat that comes with the Stamparatus as the stamp is photopolymer 
  • I placed the card mat on the mat and used one of the magnets to hold it in place
  • I placed the tree stamp from the Waterfront set in the place where I wanted it to be
  • I placed one of the plates in the slots at the top of the board
  • I then closed it so it picked up the stamp
  • I inked the stamp with Versamark then closed the plate down to make the stamped image
  • I bought it back up and pulled the plate out (plate needs to be at a right angle ⊾to the base)
  • I then moved it along one notch on the hinge
  • I repeated the inking and stamping
  • I then moved it along one more notch on the hinge
  • This is called the 'Step Hinge' 
  • I repeated this until the card base was covered
  • I then covered the images with Copper Embossing Powder and heat embossed the trees
Completing the card
  • I stuck a length of the Copper Trim around the card mat below the trees 
  • I then used dimensionals to stick the embossed sentiment that had been cut out using the small label punch

Embossed Border

  • As an alternative to using the Copper Foil to mat the Springtime Foil DSP I embossed the edges of the card
  • I used the Versamark to ink all for edges of the card base by rubbing the ink pad on it
  • I covered the ink with Copper Embossing powder and heat embossed
  • This gives the effect of copper all round the mat
  • This edge has the same effect as the embossed trees
  • I like it as an alternative and it allows you to have a similar effect if you do not have the Foil Cardstock


Now you can click on the video below and watch the tutorial 


I hope you enjoyed this project, if you were lucky enough to reserve your own Stamparatus  then I hope it arrives soon. I you did not reserve then it will be available in the new catalogue coming in June 2018.

See you again soon

Gez xxx

My Shop 
My shop is open 24/7 Click here to shop! Remember that during Sale-A-Bration you earn free products for every £45 you spend (not including p&p)

Joining Offer
There is no better time to join Stamping' Up, during Sale-A-Bration you get to choose
  • £130 worth of products for your starter kit 
  • AND 2 stamp sets of your choice 
  • All for £99 (p&p free with starter kits). 
  • 20% discount on future orders, rising to 25% when promoted
  • There is no obligation to sell you can be a hobby demonstrator and just shop for yourself with the 20% discount. 
  • Click here to join my team!

·       Follow me on Facebook

·       Follow me on Instagram

·       Follow me on Pinterest


·       Join my Facebook Group