Monday, 9 April 2018

Pootles Team Swaps

What an amazing weekend I've had. It started on Friday with a Pootles Team Celebration afternoon and then on Saturday it was On Stage - Stampin' Up! annual catalogue launch. It is lovely to get together with the team, we chat every day online but it is so much better when we can do it in person. Like at On Stage when the Pootlers get together we swap. Today I am going to show what I made for the team.

Pootles team swaps

These are little mini gift bags which surprisingly took me an age to make and so I abandoned the toper I had planned as it got to 1.30am on the day I was leaving at 9am and sleep was required! In the picture you should be able to see a scissor charm - this is what was inside the bag, a scissor charm for everyones snips :-)

Measurements

Because I was making 56 of these I wanted to use as little DSP as possible so designed this little bag that could be made from a 3" x 3 3/4" piece so you get 12 from a 12" x 12" sheet!

I used Fresh Florals for the this bag and used all the current in colours. I fastened each bag with some Whisper White Bakers twine and tied 56 bows! Never again! lol

  • Fresh Florals DSP 3" x 3 3/4"
  • Score on Long side @ 1 1/4" - 1 3/4" - 3"- 3 1/2" 
  • Score on Short side @ 1/2
  • Flip over and score again @ 1/2"
  • The 1/2" scored on wrong side is folded over and glued down
  • The the back is made up as usual
I have no idea why it took so ling to put these bags together, lots of snipping, notching, scoring, burnishing, gluing I guess.

Charm


I bought the charms from eBay and the fastenings and attached the charm to the fastening. There are loads to choose from and they are inexpensive, I got 15 for 99Pp These were then wrapped in tissue and placed in the bag.

So now you have the supplies, press play below and craft along with me :-) 


If you would like to experience 'swapping' then why not join my team and you can attend the next Pootlers team day in September with me and attend On Stage in November. The perks of being a demo are great and the discount is enough in its self, you can just be a hobby demo who just buys for themselves or you can start your own business its entirely up to you and I am here to help you every step f the way :-)

I will be back with the swaps I made for On Stage soon :-)

See ya soon

Gez xxx

My Shop 

My shop is open 24/7 Click here to shop!

My Team

  • Click here to join my team!
    • No obligation to sell, make videos, blog etc
    • You can just join up and get the 20% discount for yourself
    • If you want to start a business for £99 then this is the way to do it!
    • Chose £130 of products for £99
    • You also receive a business pack to get you started
    • 2 months FREE online shop
    • Support from me and the wider team when you join my team
    • I am a Simply Stylish Stamper which is Crafty Carolines team
    • I am also a Pootler which is Pootles team (Sam) 
    • You will also become one of these when you join with me

Follow me on Social Media


Thursday, 5 April 2018

Stampin' Up!® Myths and Magic Square Cracker Box

Hi everyone and thank you for joining me today for the video tutorial for the #stampinforall Design Team 'Anything Goes' project. I love Stampin' Up! speciality paper because it is thicker than normal paper and really makes good 3D projects.

Today I am using the lovely Myths & Magic Speciality DSP. I am not really into the side of the paper with mermaids, dragons, knights and wizards on it but absolutely love the reverse of these papers. As I have a sample only of this paper I am designing projects that use just 6"x6". Today I have a square cracker box that holds 3 mini bars of Green & Blacks chocolate.

Myths & Magic cracker box Nigezza Creates

Measurements

I used a 6" x 6" piece of Myths & Magic speciality DSP
  • On one side score @ 1 1/4" - 2 1/2" - 3 3/4" - 5"
  • Turn 90○
  • Score @ 7/8" - 1 3/8" - 1 7/8"
  • Turn 180○ and repeat
  • Using the Envelope Punch Board place the edge you have just scored at the top of the board
  • Place the left edge @ 5/8" and punch at every horizontal score line

Topper

  • I used Bubble Over stamp set for the sentiment 
  • I cut this out with the co-ordinating Bottles & Bubbles Framelits
  • I stamped the sentiment on Whisper White cardstock using Bermuda Bay ink
  • I cut  it out using the small diamond shape die
  • I cut out the larger diamond shape in Bermuda Bay 
  • I stamped the solid small label shape in Bermuda Bay on Whisper White 
  • I cut this out with the matching die
  • I cut the larger die out of Bermuda Bay card stock
  • The four shapes were then layers up and stuck together
  • The topper was stuck on with dimensionals
Myths & Magic cracker box Nigezza Creates

Ribbon Ties

  • I used the Whisper White Organza Ribbon for the decorative ties
  • I coloured it first with the lighter Bermuda Bay Blends pen
  • I used a length of ribbon on each end of the cracker
  • I tied a knot in each ribbon as I fell that looks better than a bow, but you can of course tie a bow if you like it
Now why don't you click lay below and watch the video tutorial 😀


 You can see the original post here :-)

Bye for now and see you again soon

Gez xxx

My Shop 

My shop is open 24/7 Click here to shop!

My Team

  • Click here to join my team!
    • No obligation to sell, make videos, blog etc
    • You can just join up and get the 20% discount for yourself
    • If you want to start a business for £99 then this is the way to do it!
    • Chose £130 of products for £99
    • You also receive a business pack to get you started
    • 2 months FREE online shop
    • Support from me and the wider team when you join my team
    • I am a Simply Stylish Stamper which is Crafty Carolines team
    • I am also a Pootler which is Pootles team (Sam) 
    • You will also become one of these when you join with me

Follow me on Social Media


Tuesday, 3 April 2018

#stampinforall DT project:Myths and Magic Square Craker Box


Hi everyone and thank you for joining me today for a #stampinforall Design Team 'Anything Goes' project.  I would like to thank Amanda for showcasing the design team today and I welcome any new people to viewing my blog.

Today I am using the lovely Myths & Magic Speciality DSP. I am not really into the side of the paper with mermaids, dragons, knights and wizards on it but absolutely love the reverse of these papers. As I have a sample only of this paper I am designing projects that use just 6"x6". Today I have a square cracker box that holds 3 mini bars of Green & Blacks chocolate.

Myths & Magic cracker box Nigezza Creates

Measurements

I used a 6" x 6" piece of Myths & Magic speciality DSP
  • On one side score @ 1 1/4" - 2 1/2" - 3 3/4" - 5"
  • Turn 90○
  • Score @ 7/8" - 1 3/8" - 1 7/8" - 4 1/8" - 4 5/8" - 5 1/8
  • Using the Envelope Punch Board place the edge you have just scored at the top of the board
  • Place the left edge @ 1 3/8" and punch at every horizontal score line

Topper

  • I used Bubble Over stamp set for the sentiment 
  • I cut this out with the co-ordinating Bottles & Bubbles Framelits
  • I stamped the sentiment on Whisper White cardstock using Bermuda Bay ink
  • I cut  it out using the small diamond shape die
  • I cut out the larger diamond shape in Bermuda Bay 
  • I stamped the solid small label shape in Bermuda Bay on Whisper White 
  • I cut this out with the matching die
  • I cut the larger die out of Bermuda Bay card stock
  • The four shapes were then layers up and stuck together
  • The topper was stuck on with dimensionals
Myths & Magic cracker box Nigezza Creates

Ribbon Ties

  • I used the Whisper White Organza Ribbon for the decorative ties
  • I coloured it first with the lighter Bermuda Bay Blends pen
  • I used a length of ribbon on each end of the cracker
  • I tied a knot in each ribbon as I fell that looks better than a bow, but you can of course tie a bow if you like it
if you call back on Thursday you will be able to see the video tutorial for this project.

Bye for now and see you again soon

Gez xxx

Stampin' Up!® Perennial Birthday Card Kit

I just love the card kits from Stampin" Up!®. This one, Perennial Birthday Project Kit (145579),  however is extremely special because it comes with a beautiful box that has dividers with the months on and space to write in birthdays. t is designed for you to keep birthday cards in the box in the correct months so they are there ready to post or give when ever needed. I just love it.

This card kit does not come with the stamp set, that can be purchased separately (Perennial Birthday 145757) or you can use what ever set you have. It does however come with all the card blanks, envelopes, toppers, embellishments, dividers and full instructions to make 16 cards, 4 each of 4 designs. You can chose to follow the instructions or do your own thing, I did both, I made 4 cards up as per the instructions then made the rest up as I want to.

Stampin' Up!® Perennial Birthday Project Kit Nigezza Creates

Cards made up to kits instructions 


Stampin' Up!® Perennial Birthday Project Kit Nigezza Creates

Stampin' Up!® Perennial Birthday Project Kit Nigezza Creates

Stampin' Up!® Perennial Birthday Project Kit Nigezza Creates

Stampin' Up!® Perennial Birthday Project Kit Nigezza Creates

The instructions were really easy to follow and all I had to add was some glue, dimensionals and the stamps. Once I'd made these I decided to change things a bit and make some different cards, so I changed the card bases around.

Cards made up by changing things around

Stampin' Up!® Perennial Birthday Project Kit Nigezza Creates

Stampin' Up!® Perennial Birthday Project Kit Nigezza Creates

  • With these cards all I did was change the card bases
  • I did not use the Old Olive card base as I felt that would make nice masculine cards and so I kept this base for that
Stampin' Up!® Perennial Birthday Project Kit Nigezza Creates

Stampin' Up!® Perennial Birthday Project Kit Nigezza Creates

  • Again I did not use the Old Olive card base
  • We all need some masculine cards in our collection and they are so much harder to make!
Stampin' Up!® Perennial Birthday Project Kit Nigezza Creates

Stampin' Up!® Perennial Birthday Project Kit Nigezza Creates

Stampin' Up!® Perennial Birthday Project Kit Nigezza Creates

  • By not stamping the flower on the Old Olive and Dapper Denim cards I was able to create 2 masculine cards
  • So instead of just the 4 balloon cards that could be for males I have 2 extra 
Stampin' Up!® Perennial Birthday Project Kit Nigezza Creates

  • I made 3 balloon cards up as per the instructions
  • I then made this as the 4th card with the balloons
  • I really like the balloons with the matching card base
  • This would also make a nice Childs card as well as a masculine card

So now I have lots of cards ready for the year ahead!


I have a few bits and bobs left over and a lovely box to store these and other cards I make. It will make it easier for the rest of the family to find cards they need to send. They can include friends birthdays to the index cards and ask me nicely to make them for them!

I think this kit is great and the box makes it a must have for anyone who makes cards or who just wants to get organised.

Please click below to see the tutorial on putting the cards together.


Thanks for joining me today and I will be back soon with another project :-)

Gez xxx

My Shop 

My shop is open 24/7 Click here to shop!

Joining Offer

  • £130 worth of products for your starter kit 
  • You choose what ever you want from the catalogues
  • All for £99 (p&p free with starter kits). 
  • 20% discount on future orders, rising to 25% when promoted
  • There is no obligation to sell you can be a hobby demonstrator and just shop for yourself with the 20% discount. 
  • Click here to join my team!

Follow me on Facebook

Follow me on Instagram

Follow me on Pinterest

Join my Facebook Group

Monday, 2 April 2018

Design Team Project #stampinforall

Stampin' For All Design Team


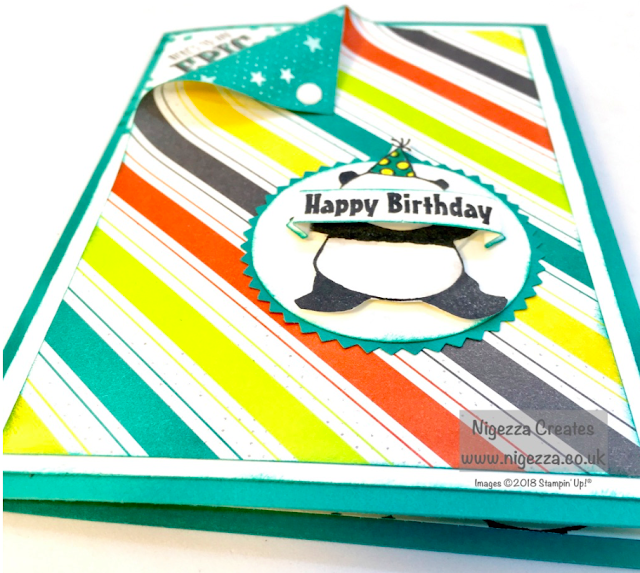
Here I am with this weeks #stampinforall Design Team Card Theme. I posted my card on Monday and people have been adding their cards to the page. The theme this week was a childs birthday. Kids cards are always fun to do and I really enjoyed using the Party Pandas for my card. It is so bright, just what children like.

Stampin For all Design team Party Pandas


I love how the curled corner turned out on this card, first time `I have done this effect.

Measurements & Resources

  • Party Pandas Stamp Set - FREE with a £45 order
  • Bubbles & Fizz DSP - Free with a £45 order
  • Epic Celebrations Stamp Set - FREE with a £45 order
  • Bermuda Bay Ink
  • Momento Ink
  • Bermuda Bay Dark Blends alcohol marker
  • Daffodil Delight Dark Blends alcohol marker
  • Basic Gray Light Blends alcohol marker
  • Colour lifter Blends
  • Starburst punch
  • 2" Circle punch 
  • Classic Label Punch
  • White Perfect Accents
  • Bermuda Bay Cardstock
  • Whisper White Cardstock
  • Bone Folder
  • I have used a standard card base in Bermuda Bay 5 7/8" x 8 1/4"
  • Folded in half
  • 2 x Mats in Whisper White 5 5/8" x 3 7/8"
  • Mat in the FREE SAB DSP Bubbles & Fizz 5 3/8" x 3 5/8"
  • I used a bone folder to curl the corner of the DSP so that I could stamp a sentiment in the corner
  • I also tamped the circles, stars and squares around the sentiment like confetti at party
  • The White Perfect Accent was stuck on the corner like a button that was fastened down
  • I really like how this effect turned out - it gives the card some extra dimension and interest.
There is a video tutorial of how I made this card on my YouTube channel.

Cards from members of the group

Here is a lovely card made by Stampin For All member Gwenn Crawford. Love this card Gwenn, thank you for joining gin the challenge. I love how bright this card is, perfect for a child.

#stampinforall Childrens birthday card


These next 2 cards were made by Elaine Spencer she is illustrating how you can take an idea and use what ever materials you have to produce something similar. 2 more lovely bright cards.

#stampinforall DT challenge Nigezza Creates

# stampinforall DT challenge Nigezza Creates


This last product was done by Debbie Harper, this card is using the theme of children's card, I love how it has so many elements of a children's party.

# stampinforall DT challenge Nigezza Creates


Thank you everyone who joined in with this DT challenge, I really enjoyed making my card I hope you did as well. Looking forward to the next one.

Thanks again

Gez xxx

Sunday, 1 April 2018

Stampin' Up Hand Stamped Petal Passions Card Using Blends

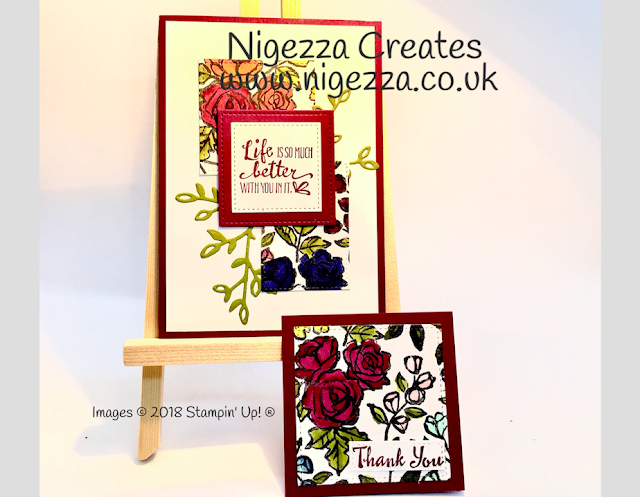
Ever since I first used Stampin' Ups Petal Palette at On Stage I wanted to hand stamp my own patterned paper and colour it using the Blends. The Blends make alcohol colouring so easy. I am not skilled in colouring yet even I can get good results using these amazing alcohol markers.

Petal Palette by Nigezza

Measurements and Resources

  • 2 scraps of Whisper White card stock
  • Momento ink
  • Petal Palette stamp set
  • Blends to colour
  • Rich Razzleberry Standard card blank 
  • Whisper White Card Mat
  • Rich Razzleberry card stock 6" x 3" folded in half to make a 3" x 3" 
  • Stitch Framelits
  • Scraps of Whisper White for the sentiments
  • Scrap of Rich Razzleberry for the Stitch Square Mat
  • Old Olive scrap
  • Petals and More Thinlits 

Assembling the cards

  • The scraps of Whisper White were randomly stamped using Momento Ink
  • It is important to use this ink because you are colouring with alcohol markers and this ink will not bleed
  • Various colours of blends were used to colour the flowers and leaves
  • Using the stitched framelits I cut 2 squares and a rectangle
  • 2 leaf sprays was die cut out of Old Olive cardstock 
  • Sentiments was stamped onto Whisper White using Rich Razzleberry ink
  • They were then cut out using the stitched framelits
  • Cards assembled as per these pictures 

Click below to see the video tutorial :-)


Petal Palette by Nigezza

Petal Palette by Nigezza


Petal Palette by Nigezza

Petal Palette by Nigezza


I hope you enjoyed this and will have a go yourself.  I would really love to see your cards.

Gez xxx

My Shop 

My shop is open 24/7 Click here to shop! Remember that during Sale-A-Bration you earn free products for every £45 you spend (not including p&p)

Joining Offer

There is no better time to join Stamping' Up, during Sale-A-Bration you get to chose

  • £130 worth of products for your starter kit 
  • AND 2 stamp sets of your choice 
  • All for £99 (p&p free with starter kits). 
  • 20% discount on future orders, rising to 25% when promoted
  • There is no obligation to sell you can be a hobby demonstrator and just shop for yourself with the 20% discount. 
  • Click here to join my team!


Follow me on Facebook

Follow me on Instagram

Follow me on Pinterest

Friday, 30 March 2018

Stampin' Up!® Party Pandas Design Team Project #stampinforall

It is my turn to do the weekly Design Team project over at #stampinforall. My theme was Childs card so of course I have used the Party Pandas. I am sharing the tutorial earlier than usual so that you can still get your hands on the Party Pandas for FREE. SAB ends on Saturday 31st March so if you want this set you need to place an order before the closing time on Friday which will be around 10`pm in the UK.

Here I am sharing how I made this card, on Saturday I will do another blog about this project that will show the cards that members of #stampinforall have also made so be sure to come back and see those.

Party Pandas Nigezza Creates

Measurements & Resources

  • Party Pandas Stamp Set - FREE with a £45 order
  • Bubbles & Fizz DSP - Free with a £45 order
  • Epic Celebrations Stamp Set - FREE with a £45 order
  • Bermuda Bay Ink
  • Momento Ink
  • Bermuda Bay Dark Blends alcohol marker
  • Daffodil Delight Dark Blends alcohol marker
  • Basic Gray Light Blends alcohol marker
  • Colour lifter Blends
  • Starburst punch
  • 2" Circle punch 
  • Classic Label Punch
  • White Perfect Accents
  • Bermuda Bay Cardstock
  • Whisper White Cardstock
  • Bone Folder
  • I have used a standard card base in Bermuda Bay 5 7/8" x 8 1/4"
  • Folded in half
  • 2 x Mats in Whisper White 5 5/8" x 3 7/8"
  • Mat in the FREE SAB DSP Bubbles & Fizz 5 3/8" x 3 5/8"
  • I used a bone folder to curl the corner of the DSP so that I could stamp a sentiment in the corner
  • I also tamped the circles, stars and squares around the sentiment like confetti at party
  • The White Perfect Accent was stuck on the corner like a button that was fastened down
  • I really like how this effect turned out - it gives the card some extra dimension and interest.
Stampin' Up!® Party Pandas Design Team Project #stampinforall

  • The Panda was stamped and fussy cut out and adhered to the 2" circle
  • The sentiment was stamped onto a scrap and punched out using the classic label punch 
  • This was then concertina folded at each end so it could be held by the Panda as a banner
  • I used the alcohol markers on the panda to colour the party hat and also for shading on the panda
  • I love how bright this card is and I think would really appeal to a child
Stampin' Up!® Party Pandas Design Team Project #stampinforall


  • I finished off the card with a Whisper White Mat on the inside
  • I stamped the confetti style stamp in each corner
  • I also stamped the Panda again
  • I used the sentiment from the Epic Celebrations
  • Awesome is a term children use a lot so again I felt this was an appropriate sentiment
Stampin' Up!® Party Pandas Design Team Project #stampinforall


Stampin' Up!® Party Pandas Design Team Project #stampinforall


I really like the way this card has turned out. It has a real party feel to it and the bright colours will really go down well with children of all ages.

So now you have all the resources gathered, click the video below and follow my tutorial t create this card yourself :-)


I hope you enjoyed this project, don't forget if you want any FREE Sale-A-Bration items you only have a few days left.

See you soon

Gez xxx

My Shop 

My shop is open 24/7 Click here to shop! Remember that during Sale-A-Bration you earn free products for every £45 you spend (not including p&p)

Joining Offer

There is no better time to join Stamping' Up, during Sale-A-Bration you get to chose

  • £130 worth of products for your starter kit 
  • AND 2 stamp sets of your choice 
  • All for £99 (p&p free with starter kits). 
  • 20% discount on future orders, rising to 25% when promoted
  • There is no obligation to sell you can be a hobby demonstrator and just shop for yourself with the 20% discount. 
  • Click here to join my team!


Follow me on Facebook

Follow me on Instagram

Follow me on Pinterest

Join my Facebook Group