Nigezza Creates aka Gez, Independent Stampin' Up® Demonstrator
Thank you for visiting my blog today, I really do appreciate it. As promised I am here with the tutorial I made for the Kylie Bertucci's International Blog Highlights Winners Hop. I was absolutely delighted to be voted into the top ten to be able to take part in the blog hop. This was the first time I had entered and I was absolutely blown away to be in the top ten and not only that but to be second!
Below is the card I made for the voting. I used a Christmas set from the new Stampin' Up! mini catalogue, Poinsettia Petals, that has a lovely thank you sentiment. I thought this would be a lovely card to give to guest you have over the festive season or to give to a host if you had Christmas with family or friends. I think it has a lovely frosty wintery feel.
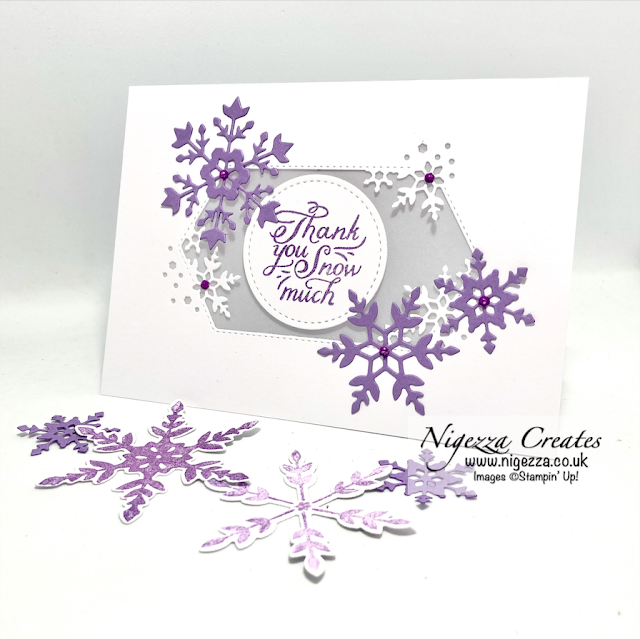
For the blog hop I have once again used a Christmas set from the new Mini catalogue, snowflake Wishes. I love that it also has a thank you sentiment and I just adore the wittiness in this sentiment, it really appeals to my Dad joke sense of humour!
For the tutorial I changed the colour and added the Winter Snow embossing folder.
Measurements and Materials
- Card base is Thick Whisper White
- 8 1/4" x 5 7/8"
- Scored @ 4 1/8" on the long side
- This makes a standard C6 card
- If your card stock is 8 1/2" x 11" then make your usual card base size as it will still work beautifully with that :-)
- The centre of the card base was cut out using the large die from So any Snowflakes
- This was then embossed with the Winter Snow embossing folder
- The Vellum backing was cut using the largest die from the Stitched Nested Label Dies
- If you do not have these dies you can just cut a penal big enough to cover the aperture
- The 3 smallest snowflakes were die cut using Misty Moonlight card stock
- The 'Thank you Snow much' sentiment was stamped in Misty Moonlight onto Whisper White and die cut with the second largest circle from the Stitched Shapes dies
- This was then popped up on dimensionals on top of the vellum so it sort of floats
- I really likes the way both dies gave a stitched edge
- To finish off the card I colour some pearls with the Dark Night of Navy blends marker and placed one in the centre of each snowflake
Now watch the video tutorial to see how this was made :-)
I hope you like this project and will give it a try. To make sure you don't miss any of my projects why not subscribe to my YouTube channel, follow my blog and subscribe to my newsletter? I will be back tomorrow, until then ... please click on the names below to continue on the hop :-)
Happy Crafting!
Gez xxx
Below are the products I used, if you click on the item it will take you directly to my shop where you can purchase the items.
Happy Crafting!
Gez xxx
Below are the products I used, if you click on the item it will take you directly to my shop where you can purchase the items.
Don't forget to use my host code to receive a share of the Stampin' rewards as a thank you for shopping with me :-)
Don't forget to use my host code to receive a share of the Stampin' rewards as a thank you for shopping with me :-)
Host code is RA6KJZVJ
Current Offers From Me
Click here to see my offers, kits and shares :-)
My Shop
My shop is open 24/7 Click here to shop!
Don't forget to use my host code to receive a share of the Stampin' rewards as a thank you for shopping with me :-)
Don't forget to use my host code to receive a share of the Stampin' rewards as a thank you for shopping with me :-)
Host code is RA6KJZVJ
If your order is £150 or more before P&P then do not use the host code as you qualify for host rewards on your own and can chose what you want :-)
If your order is £150 or more before P&P then do not use the host code as you qualify for host rewards on your own and can chose what you want :-)
My Team
- Click here to join my team!
- If you want to start a business for £99 then this is the way to do it!
- Choose £130 of products for £99
- Support from me and the wider team when you join my team
- I am also a Pootler which is Pootles team (Sam)
- You will also become one of these when you join with me
- No obligation to sell, make videos, blog etc
- You can just join up and get the 20% discount for yourself


No comments:
Post a Comment